I never truly understood the importance of knife sharpening until I found myself struggling one day with a butternut squash. A dull knife in hand, I used all my might to try and slice through the meaty flesh, only to be greeted by resistance. Not only was this frustrating, but it was also dangerous.
Since that day, I began to religiously sharpen my knife set. And I can tell you learning how to sharpen a knife has transformed my entire cooking experience. Now my knives cut through meat like butter. I’ve even found slicing through tomato skins to be incredibly satisfying.
If you’re finding yourself at the mercy of a dull knife, it’s time to start sharpening. I’ll walk you through how to sharpen a knife along with a few maintenance tips. That way you can stop mangling your produce and start slicing and dicing the way your knife was meant to.
Related: How To Cut An Onion Without Crying. We’ve Got The Solution.
Different Tools For Sharpening
No matter the quality, all knives will eventually become dull. That means your knife, at some point, will need to be sharpened.
There are several methods to choose from when it comes time for sharpening. Which one you choose depends on the quality and condition of your knife. Additionally, you’ll want to consider how much time you’re willing to invest in proper knife care.
Whetstone
A whetstone is a type of sharpening block. They’re typically made from either ceramic, diamond, or carbide with a gritty surface. Whetstones come in a range of grit levels, kind of like sandpaper.
The more coarse the grit, the more material the stone will remove when sharpening. The benefit to this is you can choose a grit according to the dullness of your knife.

Whetstones tend to be the preferred method for many home chefs. The reason why is sharpening with a whetstone will give you the best control and precision. This means a sharper blade with less metal removed.
This is precisely the method you want to use for your pricier knives. The better care you give them, the more you’ll get out of your investment in return.
Plus, whetstones are more versatile than their electric knife sharpener counterpart. You can use them to sharpen your favorite pocket knife, culinary knife, or serrated knife.
I recommend choosing a two-sided one. Two-sided whetstones come with a coarse and a fine grit. For dull knives, start with the coarse side then switch to the finer side to polish.
Pros
- Inexpensive
- Works for smooth and serrated knives
- More control
- Compact
Cons
- Learning curve
- Timely
How to Use a Whetstone
- Place the whetstone on a non-slip, flat surface with the coarse side up. A rubber kitchen mat works well.
- Place the heel end of the knife on top of the whetstone while angling your blade (typically 15 to 20 degrees). I recommend facing the knife away from you to avoid injury.
- Begin dragging the knife on the whetstone until you reach the tip of the blade. Repeat about 15 times.
- Flip and repeat on the opposite side of the knife. Do this until the knife is sharp.
- Turn the whetstone over so the fine side is facing up and repeat the same process until polished.
Waterstone
A waterstone is a type of whetstone that involves, you guessed it, water. This method is highly effective at restoring dull blades without removing too much metal.
The trick to working with a waterstone is to keep it saturated. You’ll need to submerge it in water before sharpening and keep it wet during use. This process will require some patience on your part, but the final result is very satisfying.
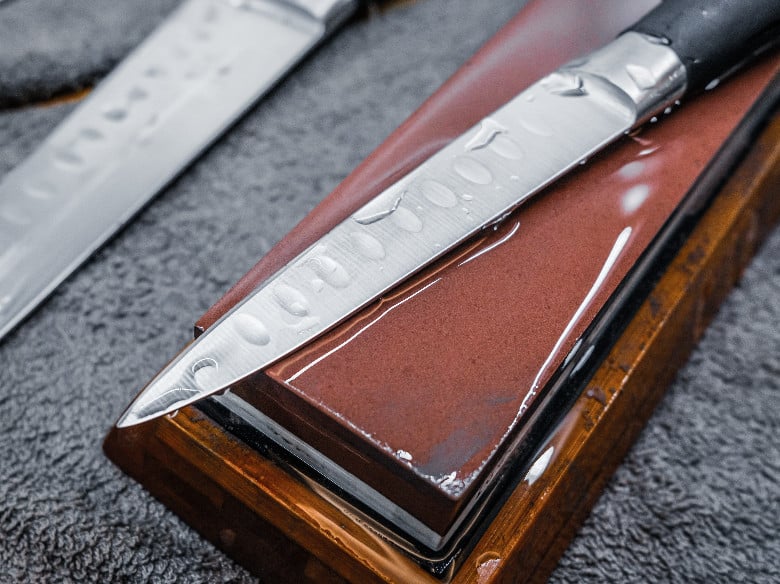
Keep in mind, some waterstones are two-sided with a coarse and a fine grit. Others will have only one grit. If you aren’t using a double-sided waterstone, you’ll need a coarse stone and a fine stone.
Pros
- Precise
- Doesn’t remove too much metal
- Excellent for quality knives
- Works for smooth and serrated knives
Cons
- Not as quick as electric knife sharpeners
- Need to keep the stone wet
How to Use a Waterstone
- Soak your waterstone in water for roughly 10-15 minutes. You’ll need to continually check the waterstone and add water as needed. Once fully saturated, place the waterstone on the counter.
- Starting with the coarser waterstone, place the knife on the waterstone at a 20-degree angle. Be sure the blade is facing away from you to avoid injury. Drag the blade across the stone for about 15 strokes.
- Flip the knife and repeat on the opposite side.
- Once sharp, repeat the same process on the fine grit waterstone to polish.
Electric Sharpener
There is a common misconception that all electric knife sharpeners remove too much metal from the blade. While some certainly will, it depends on the quality of the electric knife sharpener along with the user.
A good electric knife sharpener won’t remove excessive amounts of metal from the blade. Additionally, it will get the job done swiftly. That is, as long as you follow the directions according to the manufacturer.
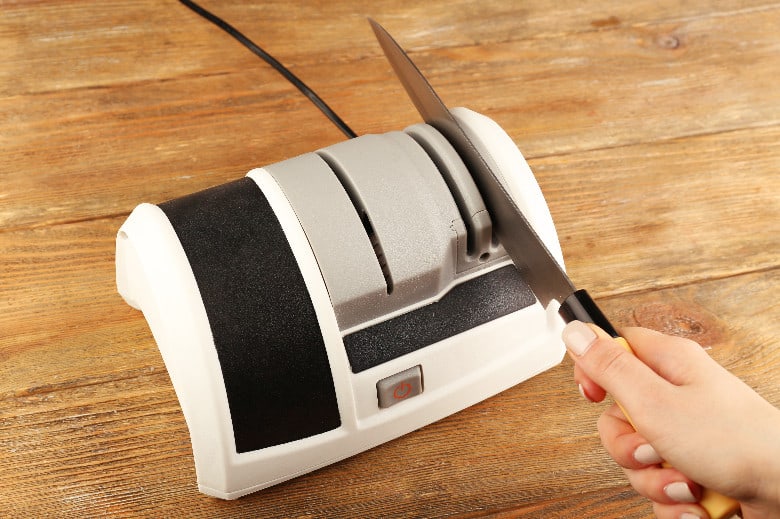
Another bonus is electric knife sharpeners are good for repairing extensive damage. They’ll help you remove noticeable chips or knicks in the knife blade.
Keep in mind not all electric knife sharpeners are a one knife fits all sort of deal. It’s harder to sharpen a serrated blade with them. They also aren’t as precise as manual methods.
When you invest in expensive knives you want to keep them in prime condition. So an electric knife sharpener that doesn’t have the same precision as a manual knife sharpener may not be the best choice.
That said, for your less expensive Cuisinart knife set, electric knife sharpeners will work just fine. Especially if you value efficiency over quality.
Pros
- Fast
- Easier to use
- Better for extensive knife damage
Cons
- More expensive
- Less precision
- Not good for all knives
How to Use an Electric Knife Sharpener
- Place the electric knife sharpener on the kitchen counter.
- Starting with the coarse setting, place the heel of the blade into the sharpening groove.
- Move the blade from heel to tip, paying special attention to avoid wobbling.
- Repeat until sharp.
- Using the same motion, use the fine grit to polish.
Ceramic Mug
In a bind, you could resort to a ceramic mug. This may sound like an odd method, but it can work.
However, I wouldn’t recommend routinely using this method. A ceramic mug is not going to repair extensive damage. Actual knife sharpeners are still more effective for a razor-sharp cutting edge. Plus, they won’t put wear and tear on your mug.
Pros
- Inexpensive
- Accessible
Cons
- Easier to damage the blade
- Other methods work better
- Not good for extensive damage
- Harder to hold at the proper angle
How to Sharpen a Knife with A Ceramic Mug
- Turn the mug upside down so the bottom is facing up.
- Place the knife blade at a 45-degree angle on the rougher, unglazed ring of the mug.
- Gently pull the knife down.’
- Flip over the knife and repeat.
- Repeat the process as needed.
Hire a Pro
If you don’t have the time, you could call in the pros. There are numerous knife sharpening professionals that will take care of the work for you. You may especially want to consider leaving things to an expert if you invested in a pricey Japanese knife set that cost a small fortune.
The only real drawback to finding a pro is finding the time. That and the bills add up over time.
Pros
- Quality work
Cons
- Not cost-effective
- Finding time
Testing for Sharpness
A quick way to test the sharpness of your knife is doing a paper test. Simply hold a piece of paper and try slicing through it with a knife. A clean-cut means a sharp knife. If your cut isn’t clean, you’ll want to keep sharpening.
Obviously, you could also test your knife by doing some food prep. But if you’re not cooking immediately, the paper test is an efficient alternative.

Honing Between Sharpening
Now that you know how to sharpen your knives, let’s talk maintenance. Proper knife maintenance requires honing. While many think this process is the same as sharpening, it’s not.
Sharpening removes metal from a blade whereas honing doesn’t. Instead, it straightens the blade. This is done by stroking a knife against a steel rod. You’ve probably seen chefs do this on TV or witnessed a family member honing right before slicing into a Thanksgiving turkey.
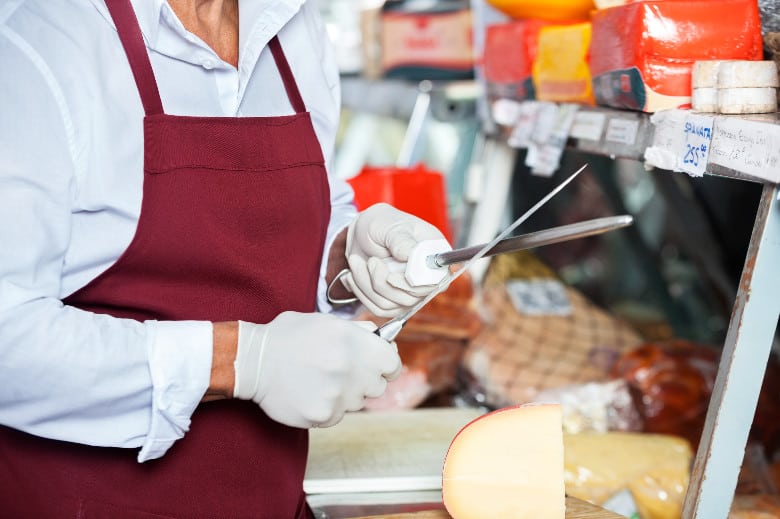
The benefit to honing is it will tackle minor imperfections that result from normal use. This is a good practice to keep up with before prepping meals and after sharpening.
How to Hone a Knife
- Place the tip of the honing rod on the kitchen counter and hold the rod vertical. You can use a kitchen towel to help prevent slippage.
- Draw that knife against the rod at a 20-degree angle.
- Flip the knife over and repeat.
- Continue until the knife is in proper alignment.
Common Knife Sharpening Mistakes
These are some of the most common mistakes people run into when sharpening knives:
- Not using the correct angle
- Over sharpening
- Applying too much or too little pressure
- Using a honing rod instead of a knife sharpener
- Using the wrong grit
Knife Sharpening Tips
Here are some helpful tips to achieve a razor-thin blade edge.
Use a Sharpie
Draw a line on your blade with a Sharpie or permanent marker before sharpening. This will help you see where metal is being removed from the blade. You can then adjust your angle or pressure as necessary.
Find Angles with Paper
If you don’t have a protractor on hand, no worries. You can find the right angle by folding a piece of paper three times (see video above). This will take you from a 90 to 45 to 22.5-degree angle.
Then place the pointed tip on top of the whetstone and your knife on top of the paper. This will be just about your desired angle.
Assess the Damage
Before sharpening, always assess the condition of your knife’s blade. If your blade is badly damaged with knicks, you’ll want to go with a coarse grit. Like sandpaper, the lower the grit number the more coarse it is.
Know Your Knife’s Angle
Most kitchen knives will need to be sharpened at a 20-degree angle. However, not all knives are made alike.
For instance, you may find a filet knife with a 15-degree blade. Or perhaps you have a cleaver with a 30-degree blade. Refer to the manufacturer to find the angle of your knife before sharpening.
Storing Knives
After all that maintenance, you can prevent further damage by storing your knives right. This means not haphazardly tossing them into the utensil drawer. Rather, place them in a knife dock. A knife dock will keep them organized, reduce damage, and help avoid injury.
If you don’t have a huge knife collection, you could place individual knives into a blade guard. Then designate a spot in a kitchen drawer where they won’t get lost with all your other kitchen gadgets.
For those short on drawer space, a magnetic strip can be a good solution. I wouldn’t recommend this though for those with little ones or the more accident-prone home chef.
Related: Kitchen Knife Buyer’s Guide: Tips For The Perfect Choice
Conclusion
A dull blade is difficult to use and dangerous. That’s why it’s worth the effort to learn how to sharpen your knives the right way.
Manual knife sharpeners offer great precision which is best for expensive knives. Electric knife sharpeners are better for efficiency and badly damaged knives. Either way, both will vastly improve your time in prepping meals in the kitchen.